EEEEK! Luminary Bags

It’s tradition in our neighborhood to have luminary bags for Halloween. A fun way to light up the path for trick-or-treaters!

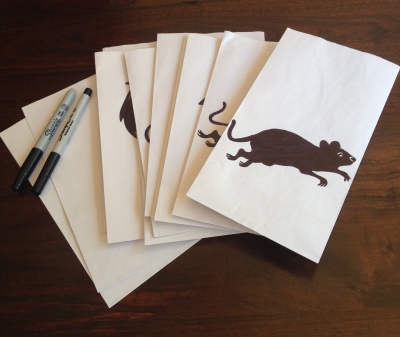
I used white paper bags from party city, found here. The idea behind this was to have “eeeek” and the rats running away in fear.

HaloweenRat

LuminaryBags

Pathway

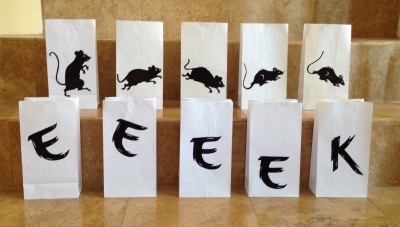
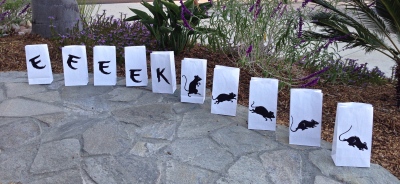
EEEEK! Rats running down the pathway away from the house.

Lights

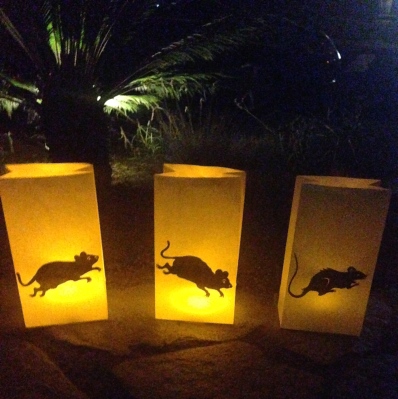
Lit up at night with LED lights.

Have a bright and happy Halloween!

Spiderweb Frames

Frames

Loving this simple DIY decoration- you only need frames and string! I already had some inexpensive frames, a few of which I had to spray paint black. Wrap and tie the string around to create the web.

Also as a side project, I was decorating pumpkins with rhinestones =)


Halloween Potions and Spells

This is a quick and easy DIY project for the perfect Halloween party scene! Create creepy concoctions using magic ingredients.

 I gathered glass jars- great place to look is Marshalls or Target clearance for mismatched jars! For taller bottles, you guessed it- wine bottles! I mean, a craft that involved having to drink wine, sure why not 🙂

Bottles

The Martha Stewart collection has some great labels, I used these 2labels

I also decided to make a few on my own, inspired by Shakespeare’s Macbeth. “In the caldron boil and bake; Eye of newt, and toe of frog, Wool of bat, and tongue of dog”

3CloseUp

Bat drink stirrers found at Target.

4Stirrers

Book of Spells- such a great find from Marshalls! One of my favorite pieces I’ve come across this year.

5SpellBook

To complete the potion look I filled the clear jars with water and food coloring.

6Potions

Great for a haunted house or on a bar cart! Happy Haunting!

Witches Bouquet

My favorite holiday is almost here! Okay, I’m a month early, but for once I’m not waiting until the last minute to frantically craft my decor.

Mt theme this year is all black and purple. Sorry bright orange pumpkins, not going to happen.

This vase can be used as a centerpiece, but as you’ll see later it’s part of my whole entryway display.

Prep

-Purple glitter mesh

-Vase + filler gems

-Black roses

-Styrofoam disc

-Handmade bats with purple accent

-Black craft wire (18 gauge)

-One creepy hand

MakingBats

To make the bats I made templates and traced onto black card stock. Add dimension by folding the wings.

VaseCloseup

Creepy hand holding the vase is a must.

WitchVases

Finished Witches Bouquet.

Happy Halloween!

Happy Halloween!

I couldn’t resist, I had to get the pup into costume 🙂

Fireman

Excited to see all the creative costumes tonight!

Jack O’ Lantern

If you haven’t decorated for Halloween yet, or if you’re just looking for an extra decoration to put up- here you go!

These jack o’ lanterns are so simple to make, so spend time being creative with the faces 🙂

Jack O Lantern Faces

I used different size lanterns- the minis are my favorite!

Mini lanterns found here, larger lanterns can be found here.

Cut out a few different faces on black construction paper. After you assemble the lanterns, all you need is a few dots of hot glue to hold the pieces on. Make sure to put a face on both sides!

Lanterns

Fun faces

These lanterns are bright enough with just the natural light of the room.

Mini lanterns!

Happy almost Halloween!

Spooky Frosted Treats

Rice krispies treats are a classic. So why not take this easy and simple snack and turn it into a Halloween treat!?

Any variation of the recipe will work, but I used the Kellogg’s Rice Krispies Original.

What you need:

  • 3 tablespoons butter or margarine
  • 1 package (10 oz) regular marshmallows
  • 6 cups Kellogg’s Rice Krispies cereal
  • Black and white frosting
  • Decorating bag
  • Wilton lollipop sticks found here
  • Wilton bag kit found here

Lollipop sticks and clear bags

To make ghosts and tombstones cut the rice krispies treats into rectangles (2 x 3 inches). Then trim the two top corners to make it a rounded top. The Halloween themed ones can be cut into 2 inch squares.

It’s easiest to place them on the lollipop sticks now, before they are completely cooled.

Rice Krispies Treats

Now it’s time for the frosting!

  • To make ghosts, cover half the rectangle with white frosting starting from the top and going down diagonally. Let dry, then dot the eyes with black frosting.
  • To make tombstones, cover the entire top half of the rectangle with black frosting. To give it a spooky feel, leave the bottom edges of the black frosting uneven. Let dry, use the white frosting to write RIP.
  • To make the Halloween themed ones, decorate half the square with either color frosting. Cover with Halloween themed sprinkles.

Frosting

After the frosting is completely dry, place each treat in a clear bag. These make a fun display for Halloween parties 🙂

Halloween treats!

Brighten up Halloween

Halloween decor doesn’t have to be dark and gloomy- add some brightness!

These luminary jars will make great decorations for around the house. You can even place them along the window sill for a great look from the outside.

The supplies for this craft are pretty simple! What you need:

  • Different size jars
  • Tissue paper- black, white, green or orange
  • Mod podge glue(or make your own with glue and water)
  • Paint brush or paint sponge
  • Acrylic paint- black, white, green or orange

Different size jars

What you need

Extras!

  • Googly eyes for the bat
  • Black construction paper for bat wings
  • Green paper for pumpkin stems or leaves
  • Cobwebs and spiders

Start with one side of the jar and paint a layer of glue. Cover with a layer of tissue paper strips, and paint another layer of glue to seal it. Continue until the whole jar is covered. I found it easier to paint the rim of the jar with acrylic paint.

Glue + tissue paper

I made my jars into bats, pumpkins, Frankenstein and spider webs.

Frankenstein and bats

Frankenstein and pumpkins!

Spiderwebs

Saturday Sparkle

Add a little sparkle to your Saturday 🙂 My friend has the cutest Halloween decorations, so I had to share! I love the sequin pumpkin and glitter skull!

Fun Halloween Sparkle!

Fun Candy Dishes

Halloween = candy. Okay that’s pretty obvious. So if I’m going to have candy in the house- it’s going to be displayed in style! These candy dishes are super easy to make, and the perfect size for a little Halloween treat.

What you need:

  • Clay pots- small and medium
  • Orange, yellow and white acrylic paint
  • Orange glitter glue
  • Cellophane
  • Glitter spider clips

Getting started!

From flower pot to candy corn!

For the candy corn themed pots I used blue painters tape to separate the colors. For the spider themed pot I used a spiderweb stencil on cardstock. Or you can try drawing your own right on the pot!

Halloween Hershey’s Kisses!

Now for the cellophane- dot around the edges with the orange glitter glue. This adds a little sparkle to the candy corn 🙂 For the finishing touch- clip the spiders onto the web!

Halloween candy!